amibroker

HomeKnowledge Base

Choosing first day of the week for weekly compression

AmiBroker allows to define, what days to use for weekly compression. By default weekly compression uses Monday-Sunday week (i.e. Monday being the first day of the week), we can change it however to any custom day of the week to match our local calendar.

To choose the day to be used as the first day of the week, we need to go to File->Database Settings->Intraday Settings and choose the appropriate day in “First day of week” field.

Database Settings

The above example shows custom-defined week, which starts on Sunday and ends on Saturday (i.e. working Sunday-Thursday week, as in many Middle East countries).

The following Wikipedia article specifies the working week for a number of countries in the world:
http://en.wikipedia.org/wiki/Workweek_and_weekend

Customizing chart titles

When we create custom indicators in AmiBroker, then by default the program will automatically create chart title line based on the selected ticker and the information we have provided in Plot function calls.

If we use the following formula:
PlotClose"Close"colorDefaultstyleBar );
PlotMAClose20), "MA-20"colorRed );
PlotMAClose50), "MA-50"colorBlue )

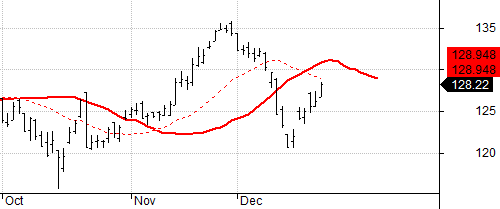
Then the auto-generated chart title line will contain:

Chart title

First item is the symbol name selected for that particular chart window (BA in this case), then the output is based on the plot names (provided in the 2nd argument of Plot function calls within the code) and colors will also match the respective plot colors. Number of decimal places depends on the settings in Tools->Preferences->Miscellaneous: Decimal places in chart titles/tools

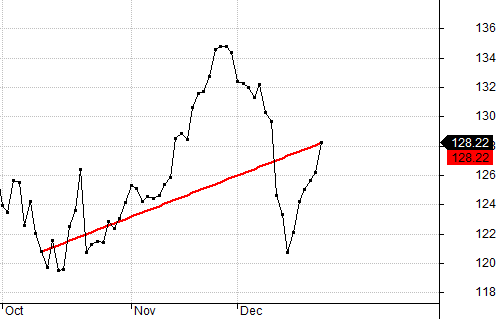
If we do not want certain plot to affect the chart titles, we can use styleNoTitle chart style, for example changing the 3rd line of the above code into:

PlotMAClose50), "MA-50"colorBluestyleNoTitle )

Would result in removing MA-50 values from the title output presented above, even though MA-50 values are still presented in the chart.

We can customize the chart title output even further by means of dedicated Title variable. If we define Title string within the formula, it will override the automatic title generation. Therefore, starting with most basic example, defining an empty string with use of:

Title ""

would hide the title output completely, while using statement like this:

Title "Close Price: " +NumToStrClose1.2 )

would generate default-color output such as the following (the price is formatted to use 2 decimal places by using NumToStr function in this case):

Chart title

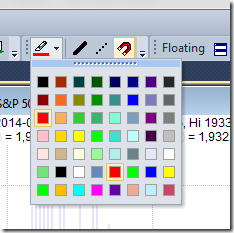
It is also possible to define chart color by using EncodeColor() function, so changing the above line into:

Title "Close Price: " +EncodeColorcolorRed ) + NumToStrClose1.2 )

would result in displaying the price value (and other text that follows the EncodeColor call) in red color.

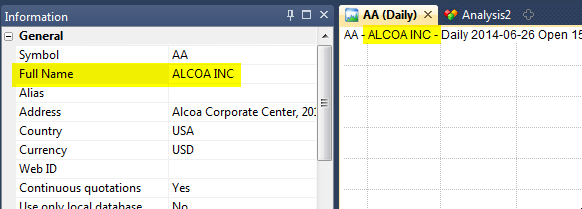
Now let us analyse the Title definition included in the built-in Price chart.

_N(Title StrFormat("{{NAME}} - " +FullName() +
   
" - {{INTERVAL}} {{DATE}} Open %g, Hi %g, Lo %g, Close %g (%.1f%%) Vol " +
   
WriteValV1.0 ) +" {{VALUES}}"OHLCSelectedValueROCC)) ))

Among other elements shown above, the Title definition uses templates like {{NAME}} or {{VALUES}} etc. in the defined string.

These are special tokens that are replaced by appropriate values at run-time:

  1. {{VALUES}} inside Title string will be replaced by automatic-values generated by Plot function calls
  2. {{NAME}} will be replaced by the ticker symbol
  3. {{DATE}} will be replaced by selected date
  4. {{INTERVAL}} will be replaced by the name of the interval
  5. {{OHLCX}} will be replaced at runtime by string “Open …, Hi …. Lo … Close (…%)” showing current price

The built-in title definition uses also StrFormat function. This function allows us to specify the string followed by the list of arguments that will be inserted into the string in places, where %f, %g or %e specifications are entered.

Chart title

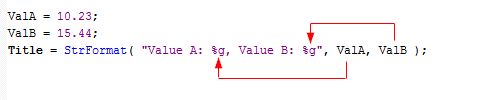
If we use the code like the one above, it would produce the following output:

Chart title

Those specifications allow us to format the output string accordingly.

  • %.0f will output a number without decimal places (with rounding if necessary), such as 393
  • %.1f will output a number with 1 decimal place, such as 392.7
  • %.2f will output a number with 2 decimal places, such as 392.65
  • %.3f will output a number with 3 decimal places, such as 392.651
  • %.4f will output a number with 4 decimal places, such as 392.6510
  • %e will output scientific notation (mantissa/exponent), such as 3.92651e+2 (3.92651 * 10 ^ 2 )
  • %g uses automatic formatting and displays as many decimal places as required to show full precision of given number (392.651)

The documentation of the StrFormat function is available in the manual

http://www.amibroker.com/f?StrFormat

In the above example the whole title definition is enclosed with _N() function. This just prevents from displaying the title string within the Interpretation window, so using _N() does not really affect the output within the chart.

How to show date axis in a newly created chart pane

When we double-click on the selected indicator in Charts window to display it in a new chart pane or apply our custom code as indicator, by default most of the indicator formulas will not show the date-axis, unless we specified such requirement in our formula.

In order to display the date axis, we need to click on the chart with the right mouse button, choose Parameters->Axes&Grid tab, then set Show date axis option to YES.

Axis&Grid

There is also a way to pre-code such condition in our custom indicator formula. To enable data-axis display when we apply the new indicator formula, we just need to add relevant SetChartOptions() function call:

SetChartOptions0chartShowDates );

// sample custom indicator
PlotRSI(), "RSI"colorRed )

More information about SetChartOptions function can be found in the AFL reference:
http://www.amibroker.com/f?SetChartOptions

High-Low of certain hours of the day

When we want to calculate high / low of selected hours of the trading session (e.g. first two trading hours), we can refer to TimeNum() function to identify timestamps of the bars. Then with use of HighestSince and ValueWhen functions we can obtain the high/low readings we need.

tn TimeNum();

// define start/end hours in TimeNum format
StartTime 93000;
Endtime 113000;

// these conditions are true when TimeNum of the bar equals startime/endtime
StartBar tn == StartTime;
EndBar tn == Endtime;

// on the end bar we read the value of highest high or lowest low since the start bar
myH ValueWhenEndBarHighestSinceStartBarHigh ) );
myL ValueWhenEndBarLowestSinceStartBarLow ) );

// display price and high / low arrays
PlotClose"Close"colorDefaultstyleBar|styleThick );
PlotmyH"myH"colorGreenstyleThick );
PlotmyL"myL"colorRedstyleThick );

// grey lines show how highest high / lowest low develop since start bar
PlotHighestSinceStartBarHigh ), ""colorgrey50 );
PlotLowestSinceStartBarLow ), ""colorgrey50 );

// area chart shows the zone we are reading our values from
Plottn >= StartTime AND tn <= Endtime""
      
ColorBlendcolorYellowcolorWhite0.9 ), 
      
styleArea styleOwnScale010, -1)

H-L from selected hours

Now we can use myH and myL arrays in strategies that e.g. check for breakouts from the first two hours of trading session etc.

It is important to remember that the code checks for equality, so the timestamps used in our charts must exactly match the time we specify in the code. The timestamp settings can be defined in Tools->Preferences->Intraday. The approach presented above uses 1-minute data and timestamps showing Start Time of Interval

Drawing line extensions on future bars using AFL

AmiBroker allows to display the AFL-based chart output on the future blank bars area with use of XSHIFT argument of the Plot function. This functionality allows to move the particular chart by certain number of bars and place the output within the blank bars area (provided that we use positive value for XSHIFT, i.e. we are shifting the chart to the right).

The following code shows price chart with 20-period MA overlay and additionally – with the same 20-period MA shifted to the right.

PlotClose"Close"colorDefaultstyleBar );

PlotMAClose20 ), "MA-20"colorRedstyledashed );
PlotMAClose20 ), "MA-shift"colorRedstyleThickNullNull10)

Chart with XShift

However – there may be some situations where we not only want to shift the chart position, but actually calculate the position of the line on the blank bars, for example if we are producing an extension of the existing indicator line.

Let us consider a simple example, which draws a line connecting the last record of the input array with the value 50-bars ago, using LineArray() function.

The code is the following:

inputArray Close;
PlotinputArray"input"colorDefaultstyleDots );

bi BarIndex();
lvbi LastValuebi );
x0 lvbi 50;
x1 lvbi;
y0 inputArraylvbi 50 ];
y1 inputArraylvbi ];

PlotLineArrayx0y0x1y1True True ), "line"colorRedstyleThick )

and the output looks like this:
Chart with XShift

LineArray function allows to calculate the extension automatically if we set EXTEND argument to True, however – all the calculations in AFL language are performed within the ‘real bars’ area, i.e. on the available elements of the array, between array item 0 until array item (Barcount-1).

To calculate and display the values that extend past the very last bar available in the array we will use technique explained below:

  1. first we shift the input back (to the left) by N bars, so the real input data would occupy earlier part of the array and we would have extra bars at the end for the calculation of extended arrays
  2. now we calculate the position of arrays on such shifted
  3. shift the displayed output forwards with XSHIFT functionality of Plot function (so the calculated extensions would get aligned onto the blank bars as a result).

If our original input array contains 200 bars and the line was drawn between bar 150 and the bar 200, then our aim is to shift the array that way, so the line would occupy the bars between bar 140 and bar 190, while the remaining 10 bars at the end of the array could be used for calculating the extended part of the line. Then – using XSHIFT we could place the array back into its original position.

inputArray Close;
PlotinputArray"input"colorDefaultstyleDots );

// here we shift the input array to the left
shift 10;
inputArray RefinputArrayshift );

// calculations of the x-y coordinates of the LineArray
// take into account the fact that array has been shifted
bi BarIndex();
lvbi LastValuebi );
x0 lvbi 50 shift;
x1 lvbi shift;
y0 inputArraylvbi 50 shift ];
y1 inputArraylvbi shift ];

// lineArray shifted back to original (correct) position with XSHIFT
PlotLineArrayx0y0x1y1TrueTrue ), "line"colorRedstyleThickNullNullshift );

//positions that were used for calclations before using xshift
PlotinputArray"input shifted"colorLightGreystyleDashed );
PlotLineArrayx0y0x1y1TrueTrue ), "line shifted"colorRedstyleDashed )

Chart with XShift

Dashed lines in the above chart show the shifted positions of the input array and calculated LineArray before using XSHIFT (i.e. on the bars that were used for actual calculations)

Drawing indicators on a subset of visible bars

By default, the Plot function draws the graph for all visible bars. In some situations however, we may want to draw some selected bars, leaving remaining chart space unaffected.

To achieve that – we simply assign Null value for the bars that we want to skip. Our graph will just be drawn for the non-null bars.

This simple example draws candlesticks only on Mondays and leaves empty all the other days.

IsMonday DayOfWeek() == 1;
// assign Close for Mondays, otherwise assign Null
Data IIfIsMondayCloseNull );
// plot the data
PlotData"Chart of Mondays"colorDefaultstyleCandle )

The following example shows how to restrict the visibility to last N bars. The code defines a custom function, which can be called later on for the arrays we want to show only partially.

// custom function definition
function LastNBars( array, bars )
{
    
bi BarIndex();
    
lvbi LastValuebi );

    
// use Null value for bars other than last N
    
return IIfbi lvbi bars, array, Null );
}

// price plot
PlotClose"Close"colorDefaultstyleBar );

// MA-50 restricted to last 10-bars only
line MAClose50 );
PlotLastNBarsline10 ), "last 10 bars"colorRed );

// shaded area
PlotLastNbarsTrue10 ), ""colorYellowstyleArea|styleOwnScale|styleNoLabel010, -)

Draw chart only for last N bars

In the above chart both Moving average (red line) and yellow shading area have been restricted to last 10-bars only.

In a similar way we can restrict the visibility to most recent day only in intraday chart:

// custom function definition
function ShowLastDay( array )
{
    
dn datenum();
    
lastDay dn == LastValuedn );

    return 
IIflastDay, array, Null );
}

// price plot
PlotClose"Close"colorDefaultstyleBar );

// daily high / low on last day only
dailyH TimeFrameGetPrice("H"inDaily );
dailyL TimeFrameGetPrice("L"inDaily );
PlotShowLastDaydailyH ), "dailyH"colorGreenstyleThick  );
PlotShowLastDaydailyL ), "dailyL"colorRedstyleThick  );

// shaded area
colorPaleYellow ColorBlend(colorWhitecolorYellow0.1);
style styleArea styleOwnScale styleNoLabel;
PlotShowLastDay), ""colorPaleYellowstyle010, -)

Draw chart only for last day

Other practical implementations of such technique is presented in these formulas:
http://www.amibroker.com/kb/2007/03/24/how-to-plot-a-trailing-stop-in-the-price-chart/
http://www.amibroker.com/kb/2014/10/10/how-to-draw-regression-channel-programatically/

How to add full name to the Price chart title

The full name of the security can be retrieved in AFL using FullName() function.

In order to add such information to the built-in Price chart, we need to do the following:

  1. Click on the chart with right mouse button
  2. Choose Edit Formula from the context menu
  3. Modify the Title definition line, the built-in code contains:_N(Title StrFormat("{{NAME}} - {{INTERVAL}} {{DATE}} Open %g, Hi %g, Lo %g, Close %g (%.1f%%)",
                         
    OHLCSelectedValueROCC) ) ))

    We need to change it into:

    _N(Title StrFormat("{{NAME}} - " +
                          
    FullName() +
                          
    " - {{INTERVAL}} {{DATE}} " +
                          
    "Open %g, Hi %g, Lo %g, Close %g (%.1f%%) Vol %.0f",
                          
    OHLCSelectedValueROCC) ), ) )
  4. To apply these changes choose Tools->Apply Indicator from the menu.

If we have Full name information imported into the database and visible in Symbol->Information window, the updated chart title will show it next to the ticker name.

Fullname in the chart title

Setting default color for studies

In order to select color before drawing the trendline or other studies it is enough to choose the color in Color Pick (Select color) toolbar button located in the Format toolbar.

Color Pick

This allows to avoid drawing the line and changing color later on in line Properties dialog.

How to measure price / percentage distance on the chart

The easiest way to manually measure distance between two points on the chart is to use a regular trend-line drawing tool for this purpose.

First we need to draw the line between the selected points (Insert->Trendline). It may be useful to have Insert->Snap to Price option marked if we want our line to start and end exactly at OHLC levels of respective price bar.

Once trend line is drawn, we need to hover the mouse cursor over the line and the tooltip will show both price and percentage change between the Start and End points:

Measure distance

Using loops with TimeFrame functions

AmiBroker features a powerful set of TimeFrame functions that allow combining different time intervals in single system formula. There is one aspect of TimeFrame functions that is important to understand to properly use them. When we switch to higher interval using TimeFrameSet function – the BarCount does not really change – TimeFrameSet just squeezes the arrays so we have first N-bars filled with Null values (undefined) and then – last part of the array contains the actual time-compressed values. This is explained in details here: http://www.amibroker.com/guide/h_timeframe.html

Normally it does not present any problem as long as we use array functions, because array functions check for Nulls occuring at the beginning of the data series and skip them appropriately. The story is different when we try to use loops.

If we want to use looping code in higher time-frame, we can not really start our calculations from the bar 0, because it would contain Null instead of real data. That is why we would first need to detect were the actual compressed data begins and start calculations on that particular bar instead.

Here is a sample formula showing how to compute AMA function in a loop, based on weekly data (the code should be applied in Daily interval). Code will identify the first non-Null bar and initialize the first AMA value with Close of that bar, then it will continue calculations

PlotClose"Close"colorBlack );

// switch to higher timeframe
TimeFrameSetinWeekly );

smooth 0.2;
myAMA Close;

// search for start (non-null) bar
for( start 0start BarCountstart++ )
{
   if( 
NOT IsNullClosestart ] ) ) break;
}

// looping code
for ( start 1BarCounti++ )
{
    
// this part will execute only after the first non-null bar has been identified
    
myAMA] = Close] * smooth myAMA] * ( smooth );
}

// regular AMA function for comparison
weeklyAMA AMAClose0.2 );

//restore original time-frame
TimeFrameRestore();

// plot expanded values retrieved from Weekly frame
PlotTimeFrameExpandmyAMAinWeekly ), "weekly AMA loop"colorRed );
PlotTimeFrameExpandweeklyAMAinWeekly ), "weekly AMA"colorBluestyleDots )

The code above is good for pre-5.90 versions. In version 5.90 we have a new function that counts Nulls for us making the code shorter and clearer, as shown below:

Version5.90 );

PlotClose"Close"colorBlack );

// switch to higher timeframe
TimeFrameSetinWeekly );

smooth 0.2;
myAMA Close;

// new 5.90 function that counts leading Nulls
start NullCountClose );

// looping code
for ( start 1BarCounti++ )
{
    
// this part will execute only after the first non-null bar has been identified
    
myAMA] = Close] * smooth myAMA] * ( smooth );
}

// regular AMA function for comparison
weeklyAMA AMAClose0.2 );

//restore original time-frame
TimeFrameRestore();

// plot expanded values retrieved from Weekly frame
PlotTimeFrameExpandmyAMAinWeekly ), "weekly AMA loop"colorRed );
PlotTimeFrameExpandweeklyAMAinWeekly ), "weekly AMA"colorBluestyleDots )
« Previous PageNext Page »